
Jointly allows agents to digitally draft, review, sign, and execute offers all in one place—making it easier to manage offers than ever before. Today, we’ll walk you through how to set up your listing on Jointly so you can get started receiving offers.
Activate Your Offer Portal
To start receiving offers with Jointly, the first thing you need to do is activate your Offer Portal.
What is the Offer Portal? The Offer Portal is a dedicated page where you can direct buyer’s agents to submit offers on your listing. While similar to your MLS listing page, the content on the Offer Portal is a distilled version of the MLS and can be customized to include additional information on your seller’s preferences, remarks, and relevant documents. It also allows buyer’s agents to start drafting their offer for your listing directly on Jointly.
To activate your Offer Portal, you’ll need an active MLS # for your listing. Once you have your MLS #, select “Find” on the left navigation bar.
Don’t have an active MLS # yet? Try getting started by onboarding your clients.
Find your property
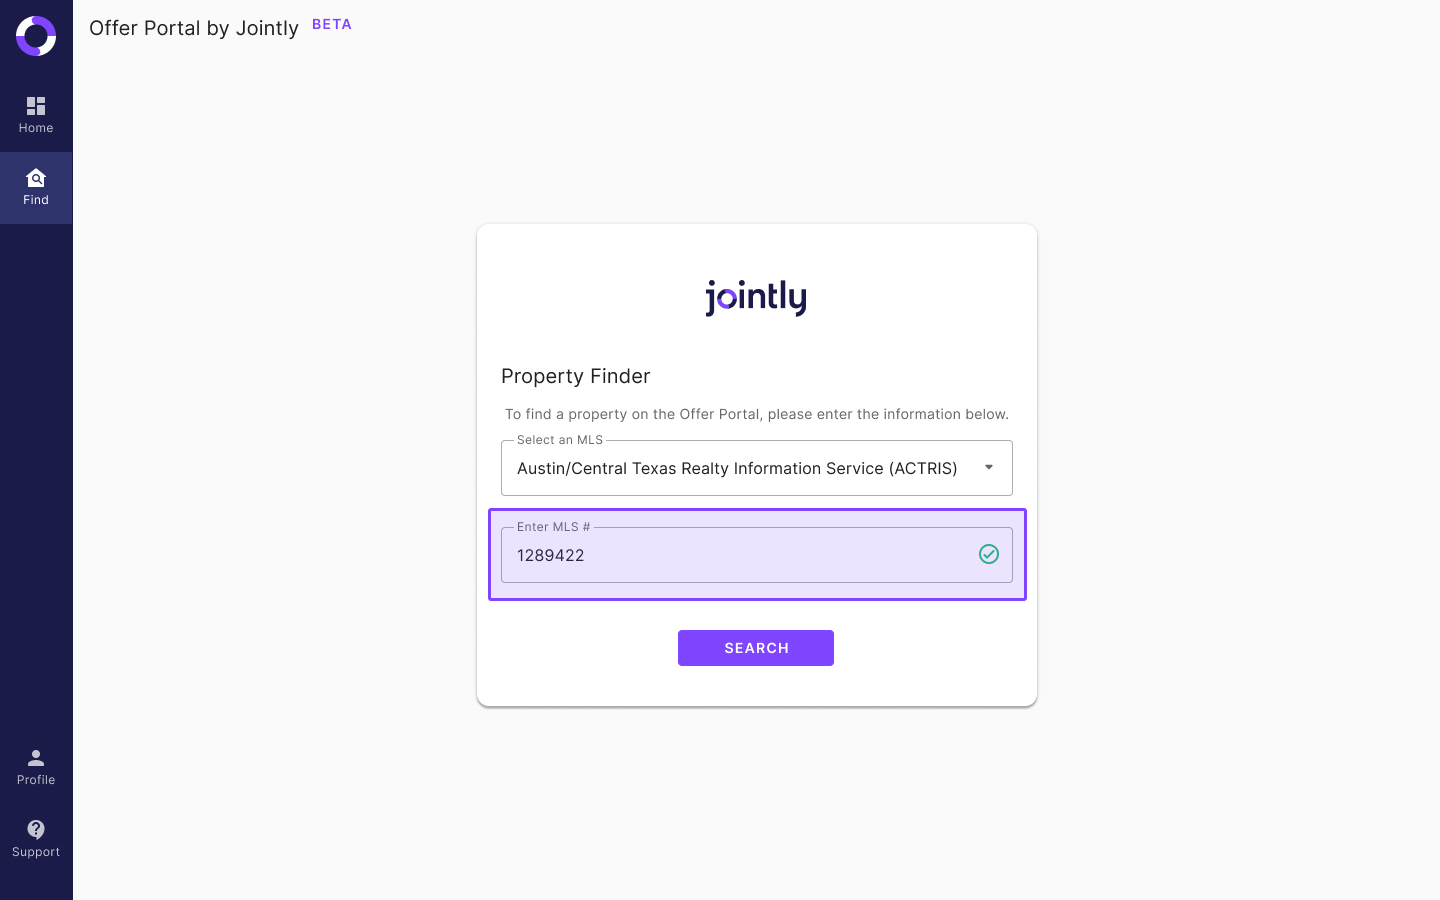
1. On the main navigation bar, navigate to “Find” to access the Property Finder
Note: If you don’t yet have a Jointly account, you’ll first need to create an account. Once you’ve signed up, you’ll automatically be redirected to the Property Finder.
2. Here you’ll be able to select your MLS and enter your listing’s MLS # (Note: At this time, we only support properties that are listed on the MLS. We currently do not support off market listings.)
3. Jointly will verify your listing’s MLS #. Once you see the green check mark next to the MLS #, press “Search.”
4. You’ll be redirected to your listing’s dedicated Offer Portal
Note: At this time, we only service the Austin metropolitan area, but stay tuned for new MLSs in the future. Want to be able to use Jointly in your MLS? Let us know here!
Claim your listing
Next, you’ll want to claim your listing. By doing this, Jointly verifies that the listing belongs to you. This ensures no other agent can claim your listing.
1. Click the “Claim your listing” button.
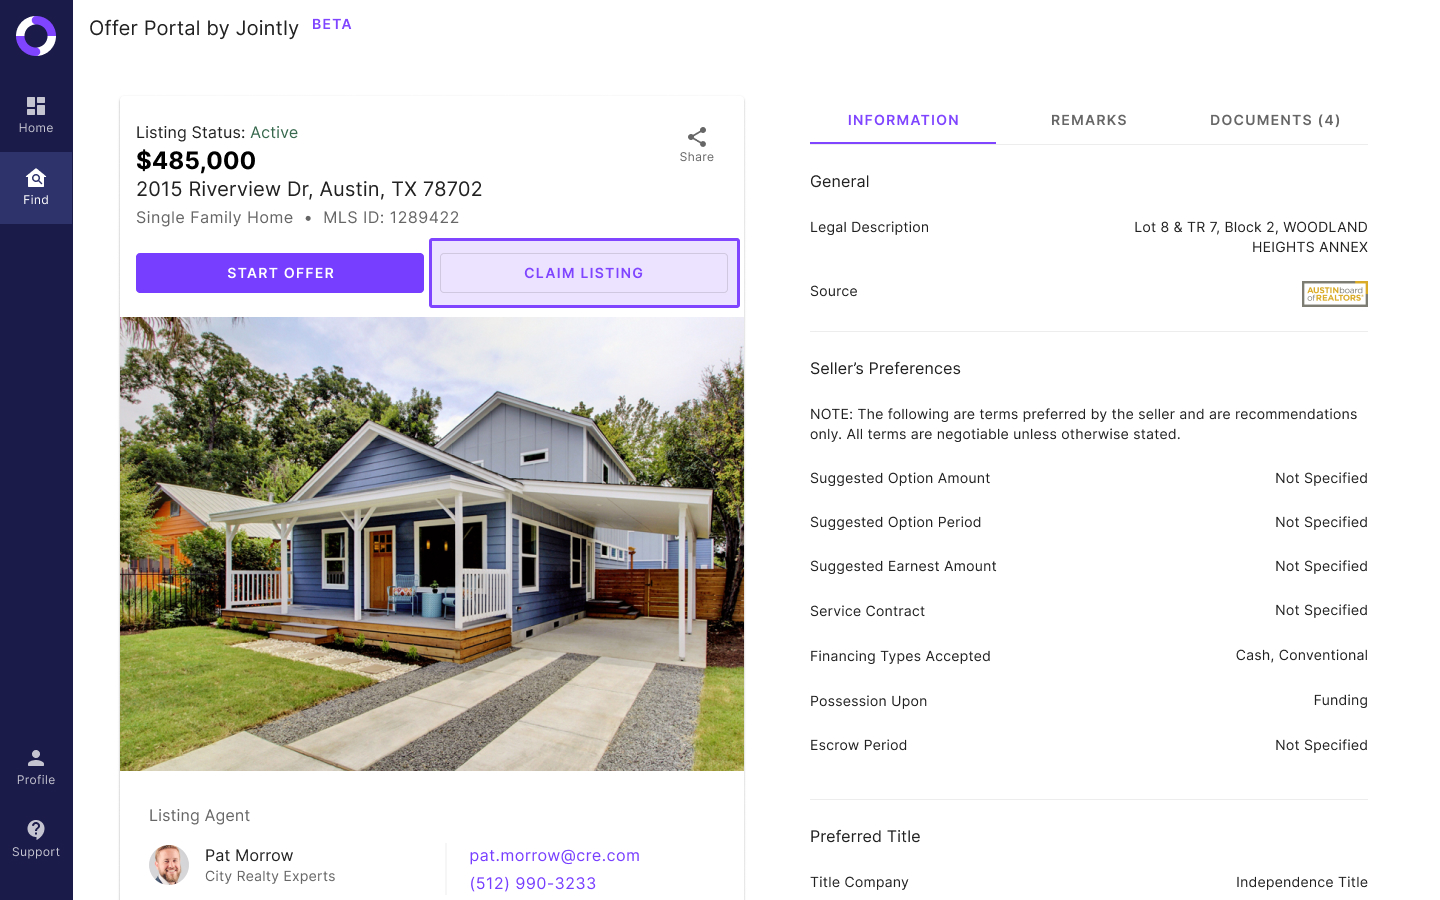
2. Jointly will automatically pull in the email address and phone number associated with the MLS listing.
3. You’ll need to verify that the email or phone number belongs to you by clicking the verification link in the email or text that’s sent to you.
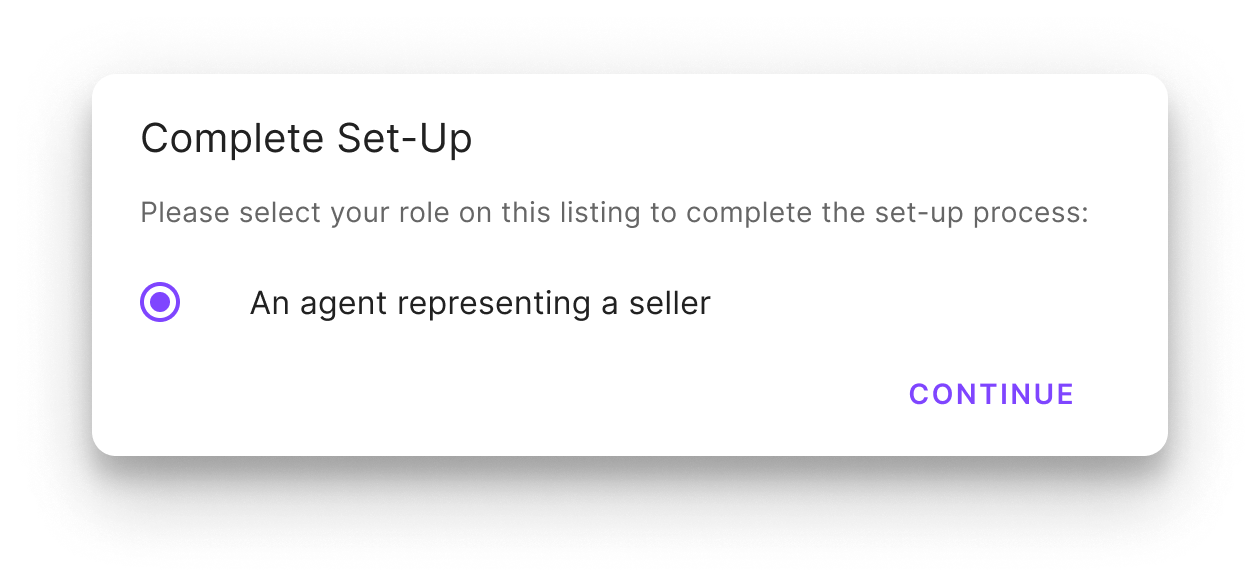
4. Once you’ve verified your account, you’ll be prompted to complete the setup process.
5. First, select your role in the transaction. In this case, you’ll select “An agent representing a seller” and press, “Continue.”
6. Next, select the property type for your listing. Jointly will automatically recognize the listing’s property type so you’ll just need to confirm.
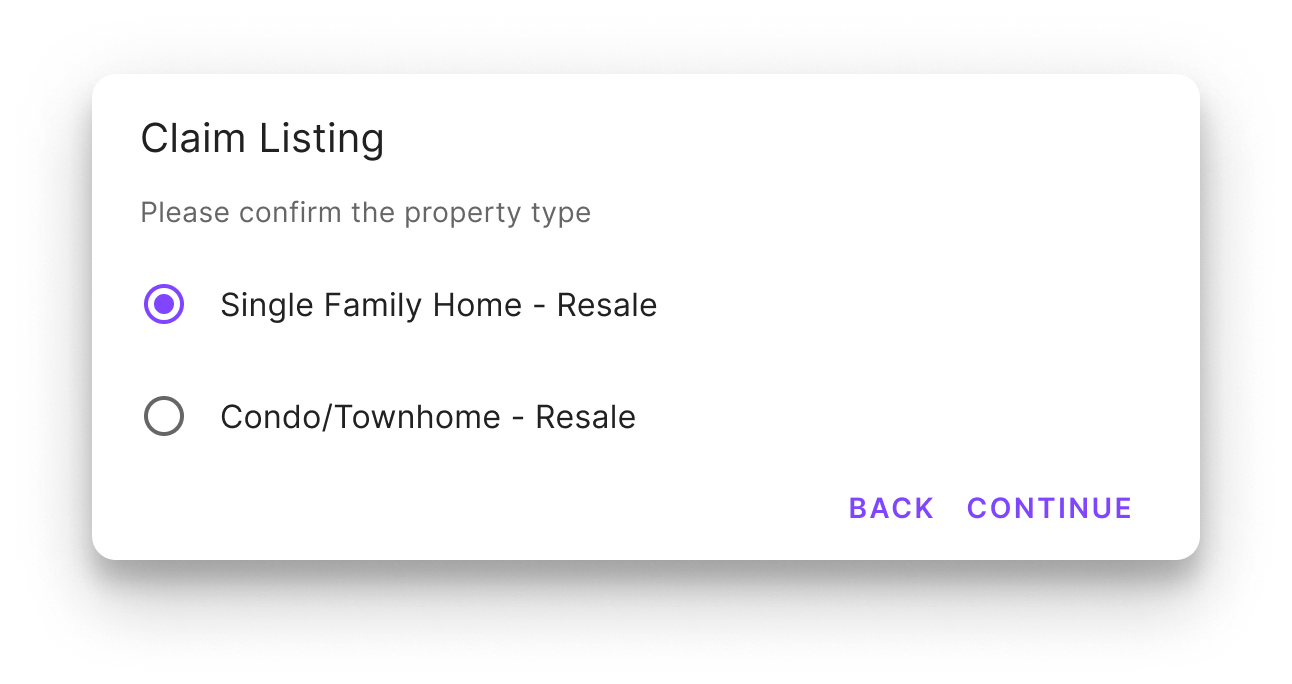
Note: Currently, you can use Jointly for Single-Family Home and Condo/Townhome resale transactions. We’re actively working on adding new property types so stay tuned!
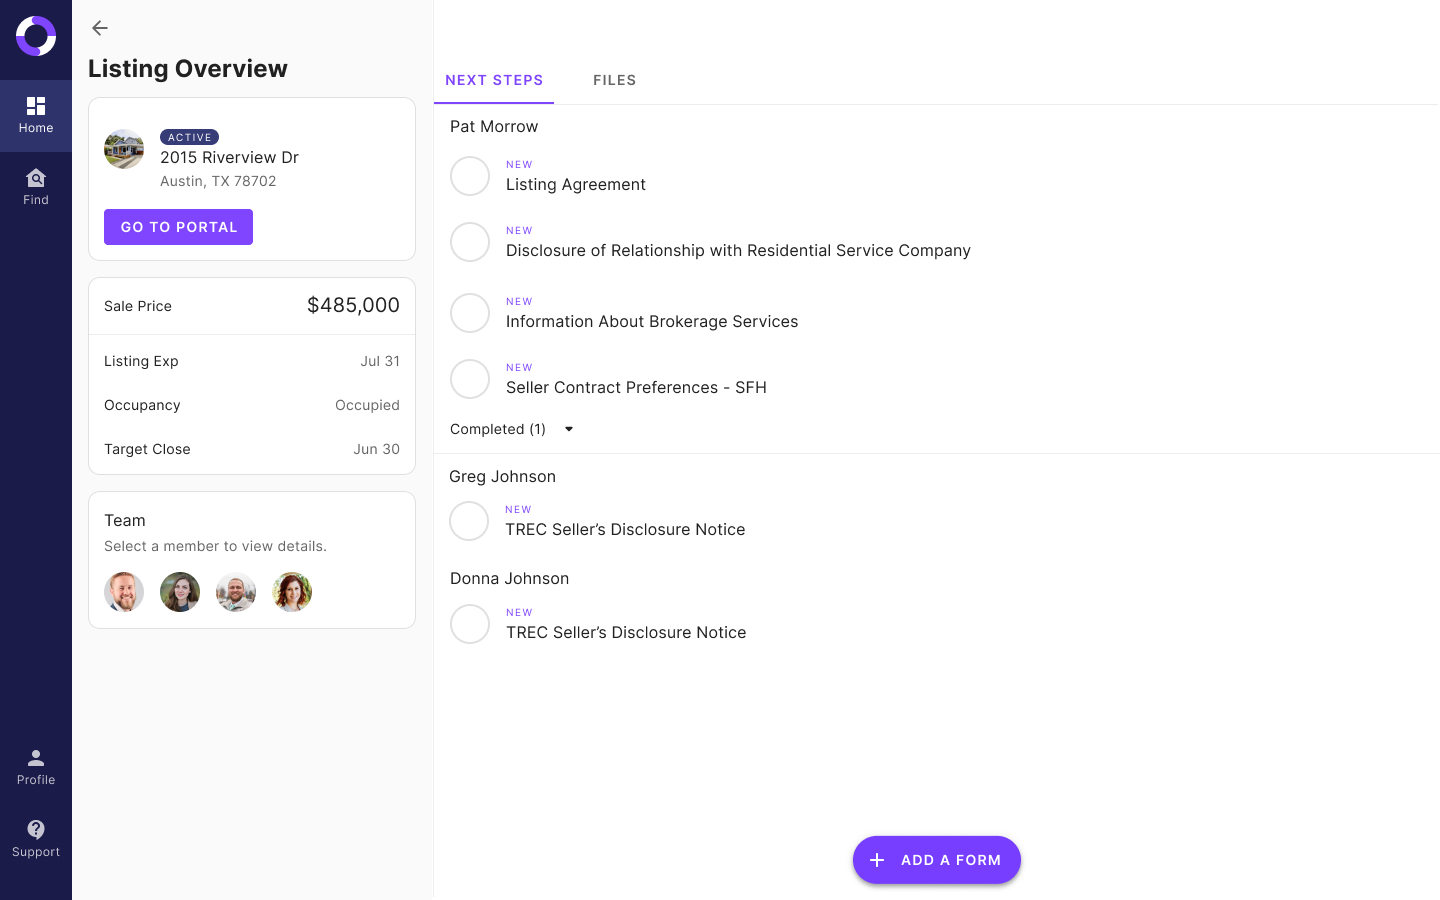
7. You'll be redirected to your Listing Overview page.
At this point, you’ve completed activating your Offer Portal and claiming your listing as your own. Next, you’ll be able to set up your client and customize your listing’s Offer Portal.
Note: After completing the above steps, you can start receiving offers on your listing. However, we highly recommend completing the next steps to setting up your client and customizing your Offer Portal. If you want to skip ahead and start receiving offers right away, scroll down to the “Start Receiving Offers” section of this post. You can always come back to finish setting up your client and customizing your Offer Portal.
Set Up Your Client
1. On the Listing Overview, you’ll be prompted to complete the Getting Started next steps. This includes the “Listing Information” and “Tell Us About Your Client” to-dos.
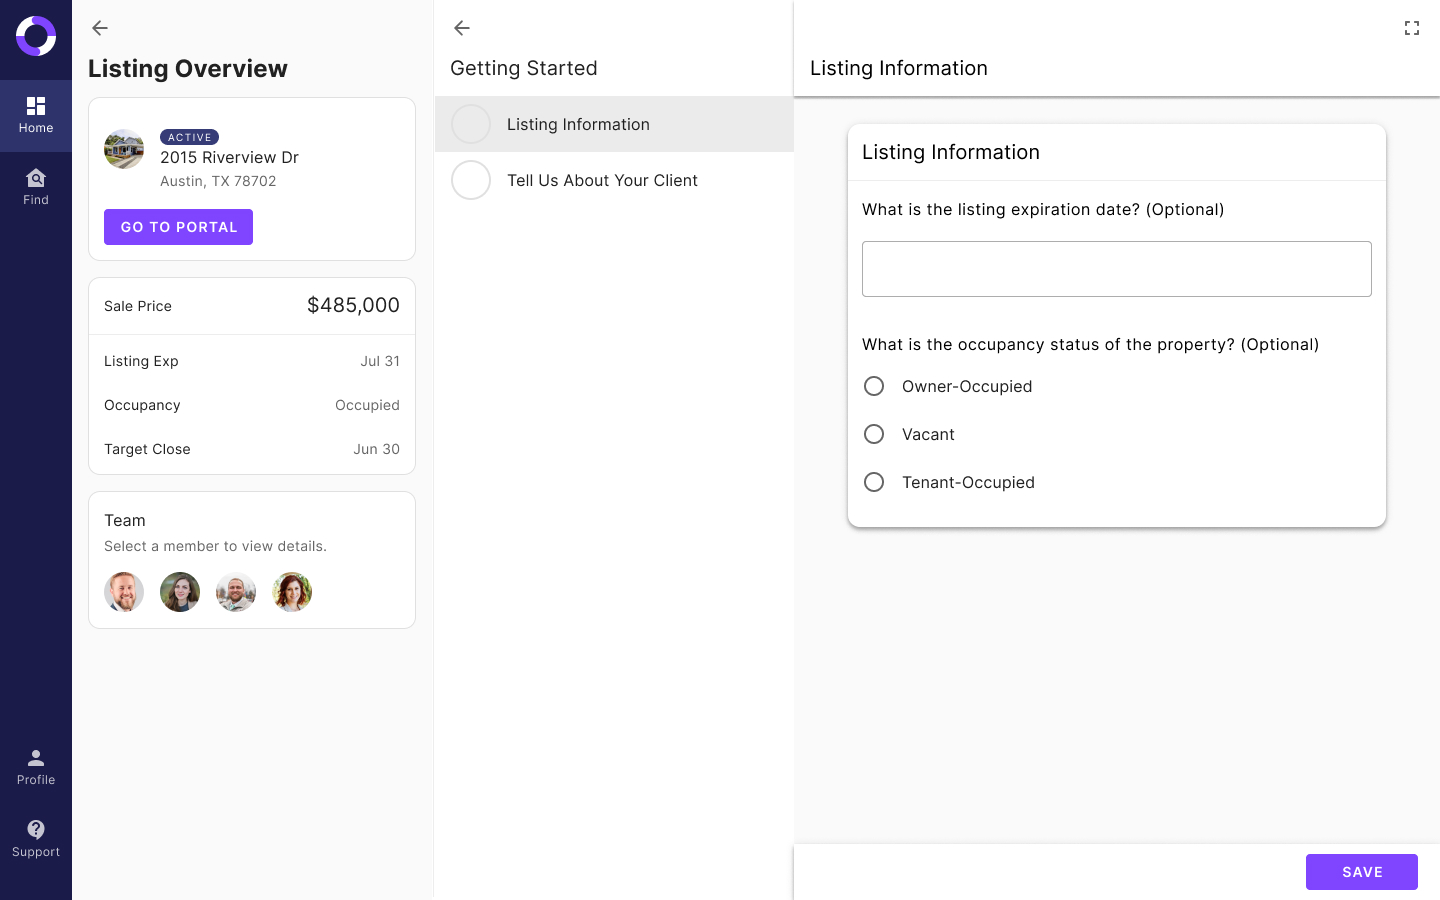
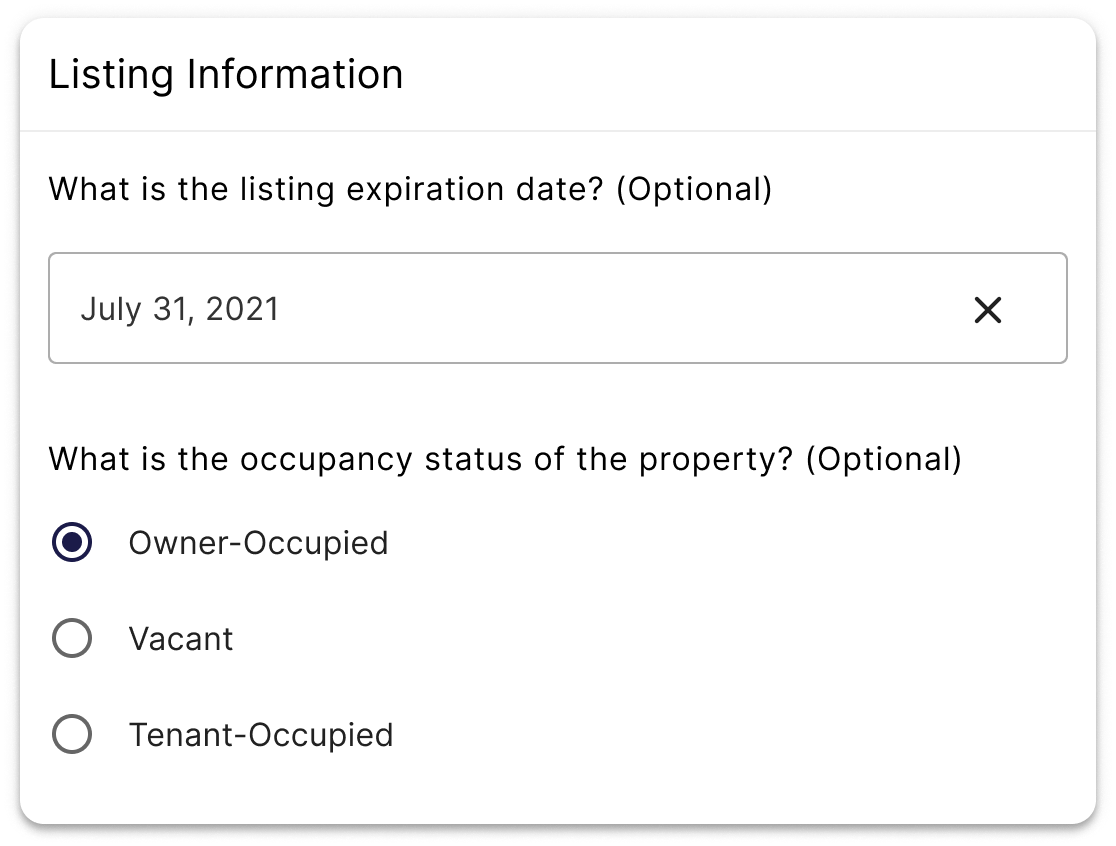
2. The “Listing Information” to-do will ask for some optional listing information including the listing expiration date and occupancy status. This information will only be visible to you and your client. It will be used later on to pre-fill parts of the Listing Agreement and the contract. Press, “Save.”
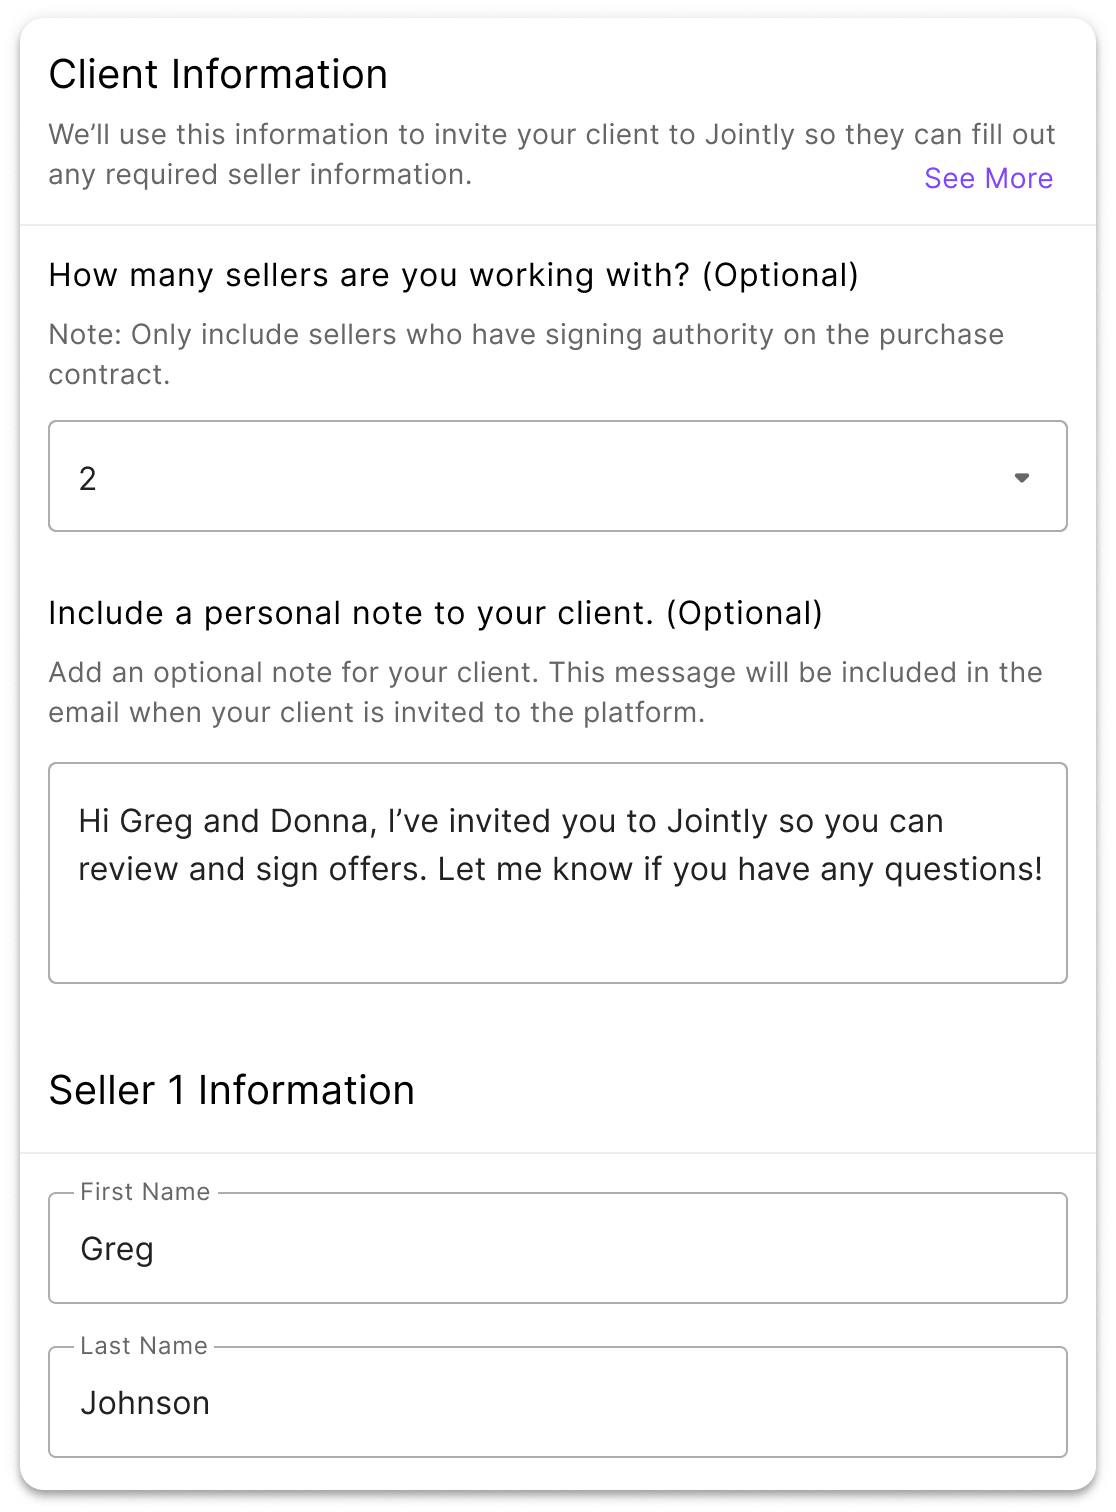
3. Next, you’ll invite your client to Jointly where they can also review and sign contracts. Jointly will ask a few questions including how many sellers you’re working with, their contact information, and how their names should appear on the contract. You’ll also have the ability to add a personal message to your client that will be included with their invitation to the Jointly platform. Press, “Save.”
4. In the next section, you will be prompted to enter your MLS member ID, team name (if applicable), and add additional documents for either you or your client to fill out.
Note: Your name or email address in Jointly must match the MLS so we can grant you access to the TAR and TREC forms. If your name in Jointly doesn’t match the MLS, you can update this information in your Jointly user profile. On the left navigation menu, select “Profile” then “Manage Profile.” Under Account Details, you can update your name. Press “Save.”
5. When choosing additional documents, some forms may be selected by default based on property information. For instance, if the property was built prior to 1978, the Lead-Based Paint Addendum will automatically be selected.
6. When you’ve finished selecting the appropriate forms, press “Save.”
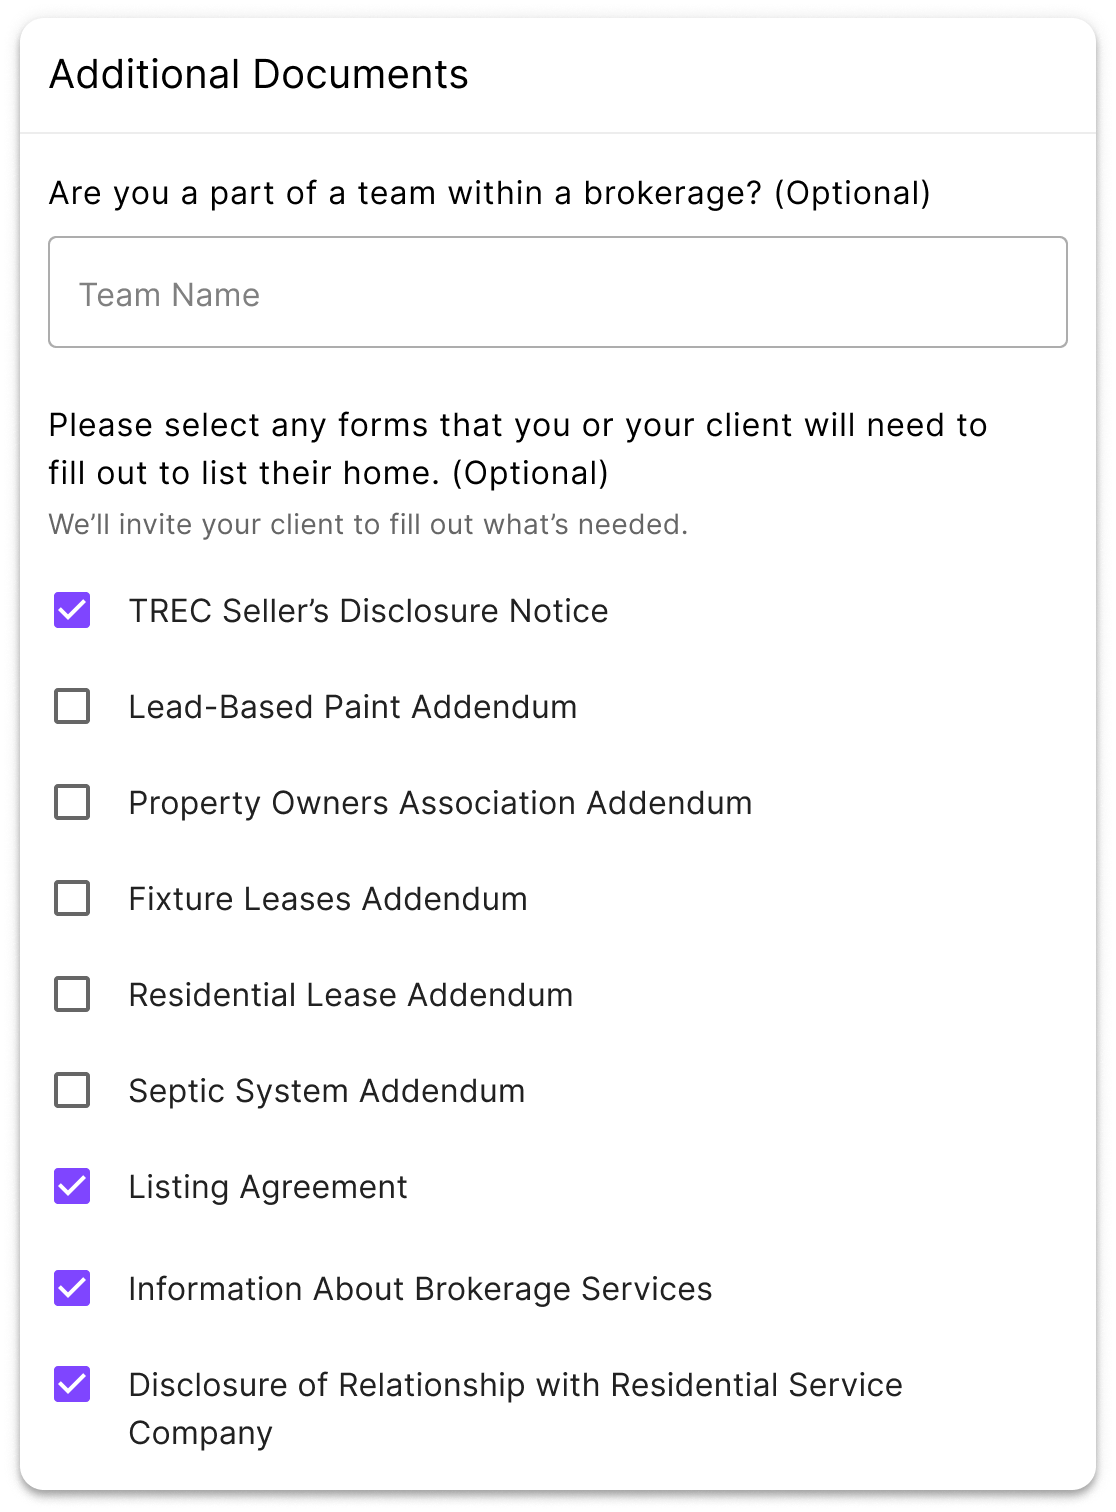
7. If the form needs to be completed by your client, we’ll automatically assign and notify them of a new to-do to complete the form on their “Next Steps” tab. If a form requires your completion, you will be assigned a new to-do in your “Next Steps” as well.
Customizing Your Offer Portal
Once you’ve finished setting up your client, you can work through the remaining items under “Next Steps” to finish customizing your Offer Portal.
Although customizing your Offer Portal is optional, it allows you to set expectations for interested buyer’s agents while encouraging them to submit a more competitive offer.
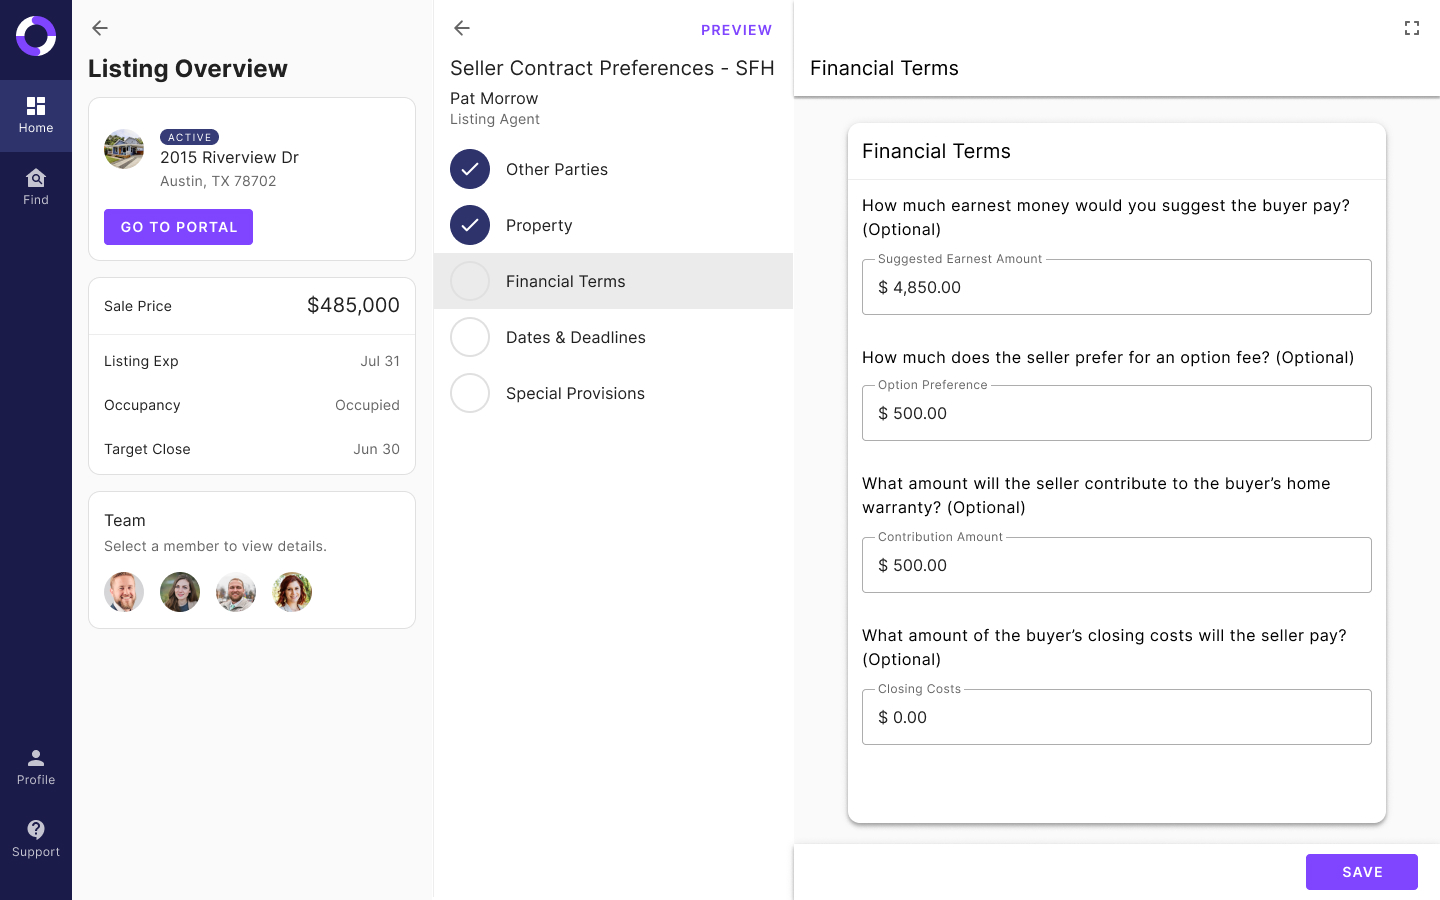
To begin customizing your Offer Portal, select “Seller Contract Preferences.”
Note: If your listing is a Single-Family Home, you will see “- SFH” after “Seller Contract Preferences.” This is just to denote the property type.
For “Seller Contract Preferences,” you’ll see five sections to complete:
- Other Parties: designate your preferred escrow officer and title company, and note if the seller will be consulting an attorney.
- Property: includes the property’s legal description. (Note: this data automatically populates from the MLS. However, in some cases, you may need to update this information (i.e. for a condo conversion)). You can also note if the seller can provide an existing survey, plans to complete any repairs, is aware of any leases on the property, and if they would like any items excluded from the sale.
- Financial Terms: provide suggested earnest money (defaulted to 1% of the purchase price), option fee, home warranty contribution, and if the seller will pay any buyer closing costs.
- Dates & Deadlines: designate the seller’s preferred option period (number of days) and if the buyer will receive possession upon closing. (Note: If the buyer will not receive possession at closing, you can indicate whether the seller needs a leaseback. If they do, a new to-do will appear in your “Next Steps” where you can indicate your seller’s leaseback preferences like the daily leaseback rate.)
- Special Provisions: add any special provisions you might want to include.
Pro Tip: Do you always use the same escrow officer for your transactions? You can set your preferred escrow agent in your Jointly user profile so all your contracts going forward will automatically populate your preferred escrow agent. On the left navigation menu, go to “Profile” > “Manage Profile” > “Contract Preferences” > “Preferred Title & Escrow Information.”
Note: Some of the information in these sections may be pre-populated based on information in the MLS. For instance, the preferred title company and property address. Other fields may include a default value. You can easily overwrite these fields if you’d like to make changes.
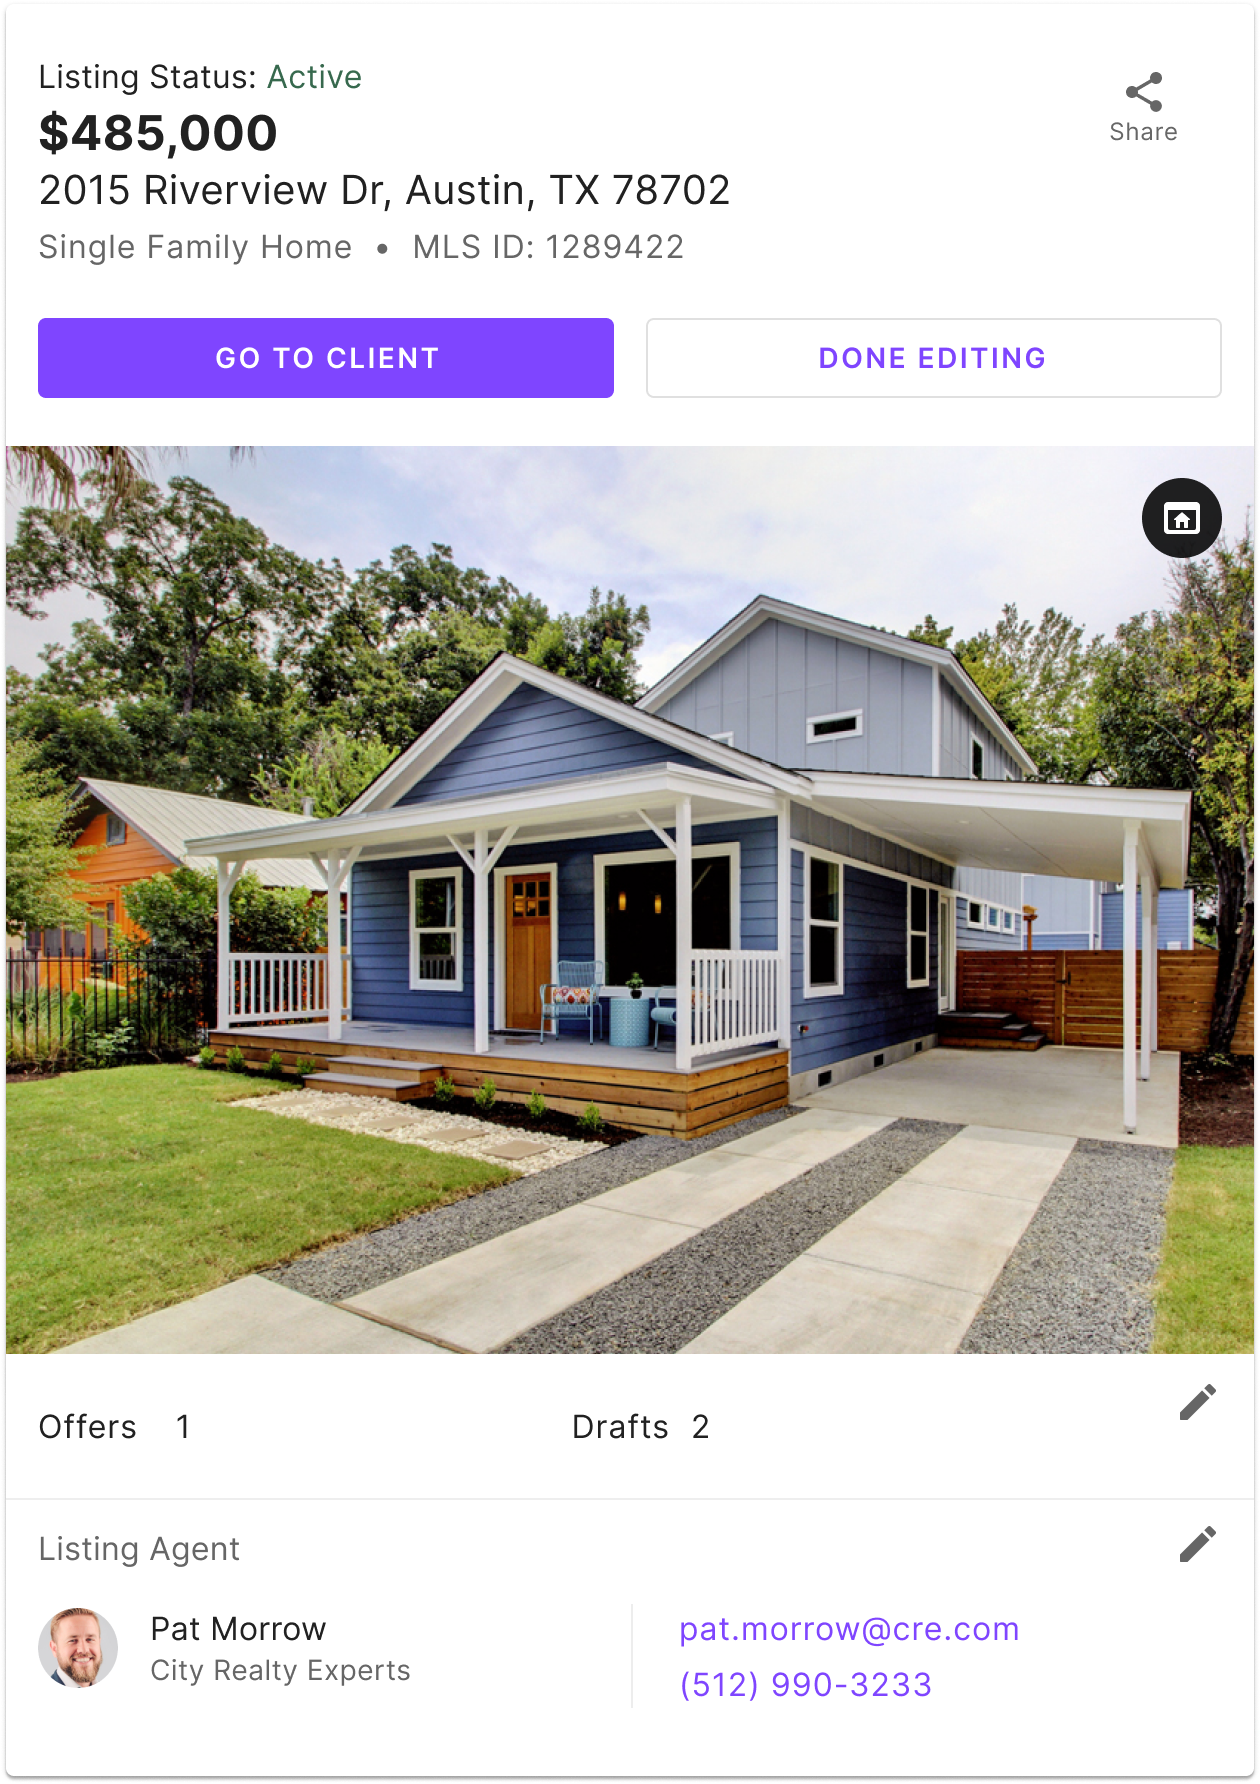
After completing these sections, you’ll notice that your Offer Portal has been updated with the information you entered. To navigate to your Offer Portal from the Listing Overview page, click the “Go to Portal” button under the property address.
On your Offer Portal page, you’ll see three tabs: Information, Remarks, and Documents. You can edit the information shown on these tabs by clicking the “Edit” button. Here’s a quick overview of each of the tabs:
- Information: The data you see here is populated based on the information you entered in the “Seller Contract Preferences” task and can be further edited here. You’ll also have the ability to edit the listing agent information.
- Remarks: By default, the Remarks tab includes the remarks as shown in the MLS. However, you have the option to edit this text.
- Documents: On the Documents tab, you can upload relevant property documents like the Property Survey or Seller’s Disclosure Notice.
Note: Buyer’s agents will need to sign in or create an account in order to view any documents you’ve added.
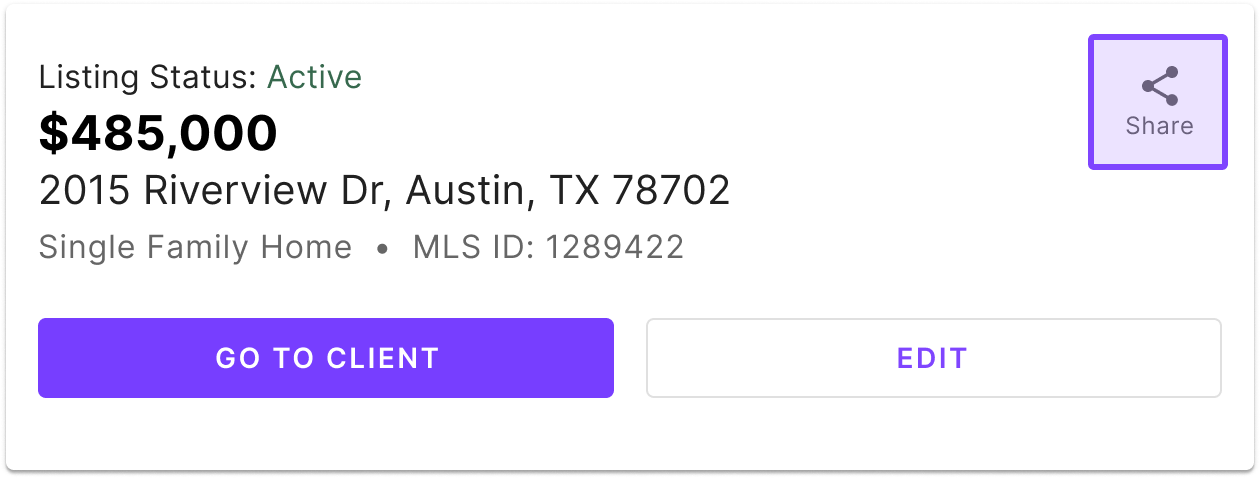
Pro Tip: While editing, you can also choose your visibility preferences for offer and draft count. If you select “public,” buyer’s agents will be able to see how many offers have been submitted and how many are being drafted.
When you’ve finished editing your Offer Portal, click “Done Editing.” To navigate back to your Listing Overview page, you can select “Go to client.”
Start Receiving Offers
Now that you have your Offer Portal set up, you’re ready to start receiving offers! But first, you’ll want to make sure buyer’s agents can access your listing’s Offer Portal page.
Share your Offer Portal link
In order for buyer’s agents to access your Offer Portal page, you’ll need to share the link. We recommend adding your Offer Portal link directly to the remarks section of your MLS listing with instructions to draft and submit offers via the link.
To share your Offer Portal link, simply click the share icon on your Portal page. A unique short link for your Offer Portal will automatically be generated so you can add it to your MLS listing. You can also share this link directly with other agents.
Once you’ve added your short link to the MLS, you can kick back, relax, and watch the offers roll in.
What to expect when you receive your first offer
1. When a buyer’s agent submits an offer on your listing through Jointly, you'll receive an email and text notification alerting you that a new offer has been received. You can click “Go to Jointly” in the email or the link in the text to view the offer on Jointly.
- Note: You can change your notification preferences in your Jointly user profile. On the left navigation bar, navigate to “Profile” > “Manage Profile” > “Notifications.” From there, you can choose to receive email notifications, text notifications, or both.
2. You’ll be redirected to the offer in Jointly and prompted to review the PDF contract documents. To review each document included in the offer, click “Mark as Done” to mark the document as reviewed.
3. After you’ve reviewed and marked all the documents as done, you’ll be able to present the offer to your clients. Here you’ll have the option of adding a personal note for your clients. After you hit “Send,” your clients will receive an email and text notification with your personal message and a link to view the offer in Jointly.
4. Once you’ve presented the offer, you’ll be redirected to the Offer Overview Page where you can see:
- To-Dos: A list of to-dos for you and your clients related to this specific offer.
- Info: A high-level overview of the offer’s key terms. Your client can also see the offer broken down this way in their Info tab.
- Contract: View the contract documents with extracted offer terms or in PDF format. You can also download the PDF documents from this tab.
5. From the Offer Overview page, you can also accept or reject the offer.
6. As you begin to receive other offers, you can view a summary of all the offers you receive by clicking the back arrow and clicking the “Offers” tab on the Listing Overview page. From here, you can click into individual offers to get a closer look and dig into the details.
And that’s it! Getting ready to launch a new listing? Sign up to start receiving offers with Jointly. While we’re in beta, the Jointly offer management platform is available for agents to use free of charge. Currently, Jointly is only available for use in the greater Austin area.
Have a question about receiving offers that we didn’t answer? Let us know by reaching out to us at support@jointly.com.